

Who remembers graphic design pre computers? sketches, mockups, colouring, PMTs, typesetting.
What would happen if a designer presented a sketch of your next marketing concept? You'd probably have a fit today. But just a little over 25 years ago, this is how it was done.
When asked what I did for a living. My standard comment was "I get paid to colour".
Hours and hours were spent hand sketching, colouring, tracing. I tell you, I was glad for all the hours I spent in perfecting the art of drafting lettering in highschool. When it came time to add example text to a mockup - it made the job easier.
Of course for headlines etc., we sometimes used letraset (more often used for the finished artwork however). Do you remember this? Those sheets with all the letters, the burnisher, aligning and praying that when it applied it applied without wrinkles and air bubbles.
Recently, my parents have been cleaning out their house giving me back all the things I left behind. The last batch I picked up included stacks of letraset, sketches and art I had completed in my 20s for the ad agency I worked for at the time and finished pieces. I couldn't believe some of these pieces - but that's another blog post.
This blog is more about how we created mockups and finished products pre computers.
So first the hand drawn mockup as I mentioned before. Once the copy was approved and photos taken, it was then time to create the artwork. What a process!
Not like today, where you go to your computer, open a few pieces of software, ad the text, images and press a button and off to print it goes. (Now, this truly is minimizing the process of today, in reality it is a little more complex than that), but for the purposes of this blog we'll leave it at that.
So, the copy has been given to the typesetter who sits at the 'typesetting machine' to produce the text and copy for the finished artwork. I worked on two machines - one with a monitor that you could see what you were typing and one that did not. Changing fonts was a matter of replacing discs in the machine (the machine allowed only 4 discs). If you made a mistake, you would have to retype the line or paragraph - there was no storage device - accuracy was key! The whole time you were typing the machine was cachinging along outputting the text on to a photo paper. When you were done the cartridge that housed this photo paper was removed and off to process it through the mega chemicals (much like developing photos). When finished you had a length of paper with text on it ready to 'cut' and 'paste' to your art board.
Now at the drafting table, the art board is taped down, your crop marks are marked on the board and you begin drawing your boards and any line work that needs to be applied in ink by hand (adding it after pasting the text wouldn't work as there was usually wax residue from pasting the text on the board at this point. Next - wax the typesetting page, cut the text you need and apply. This was the simple bit.
Working with photos - that was a whole new ball game. You were really working with slides that were measured and space left for the image on the artboard -- adding photos was done by the printer and their team at the film stage. It was quite tricky when trying to align images exactly - even cropping the image properly became a chore - I was glad I had math skills.
Special effects were added on overlays or done by specialty film houses on the original photos. It was quite the process.
Experimenting with the PMT (photo mechanical transfer) machine was probably my favourite thing to do. What can I make this machine do. The last machine the company I worked for had, was able to take images of 3 dimensional objects -- this open the doors to a new range of creativity. Other than that, the machine was used to take images of artwork or photographs. Halftone screens were applied by the machine when working with black and white images. The resulting halftone image could be pasted on the art board and go to the filmhouse for printing. Working in black and white was relatively simple. Adding colour became a process. There was no button to push then to create separations - it was all done manually.
I don't know how many sleepless nights I had wondering what would appear on the film when it came time to check these before the job was printed. One mistake required new film (sometimes you could splice in a correction but not always).
I was so excited when computers came along.. I bought my first computer and designed a logo within 1/2 hour, complete with colour and options to present. The trick then became showing it the client -- the dot matrix printer was not the best at outputting what you saw on the screen -- again another story....
... computers have definitely changed the advertising and marketing industry!
Now and then, I would love to go back to presenting a mockup hand coloured...


 How Future-Proof Is Your Business?
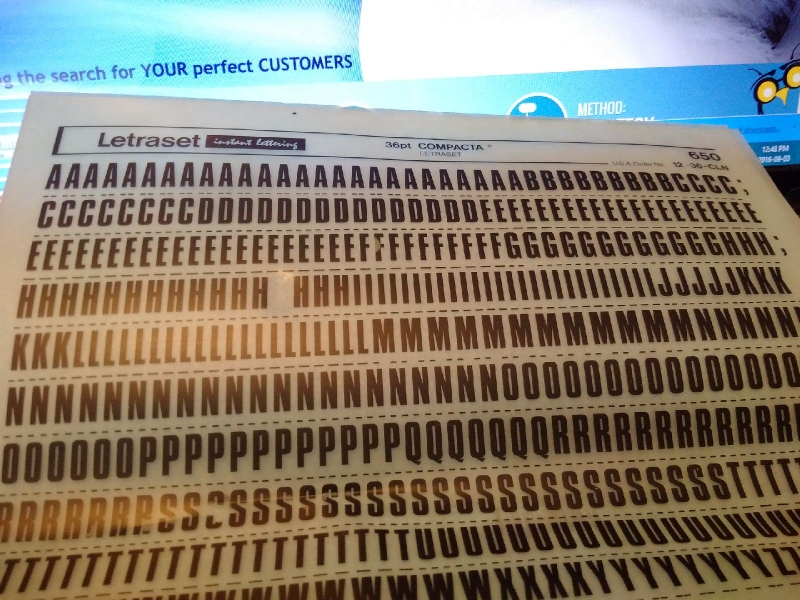